Design and Structure a simple React App
Dan Harris
@danharris_ioSo you’ve heard the buzz, the lowdown, the word on the street. React is the bee’s knees of frontend development. Being the enthusiastic go-getter you are, you’ve investigated React and now look to giving it a shot in a personal project, beyond simply following a tutorial. Sound familiar? Well this is the path I recently followed in creating my personal portfolio site (danharris.io).
I’d experimented with creating various simple React Apps and decided it was time I finally put together a serious project. Why not create a portfolio site to showcase all this awesome knowledge i’d gained? Great idea huh… so now what? Well, I went through the process of designing, structuring and finally building my simple React App. It’s this process I thought I’d share with you via an article (series of articles even).
In this article (Part 1), I’ll show you how I went from a site design, componentized™ it, chose a project structure and created the corresponding components. Without any further ado lets get into it…
* Disclaimer; I don’t claim to be an expert on React… so I’m happily open to any constructive feedback on the choices made within my small project.
Site Mockup (or in other words, what’re we building??)
Before we jump into the code, its probably good to have an idea of what it is we’re looking to build (well, duh, I hear you say).
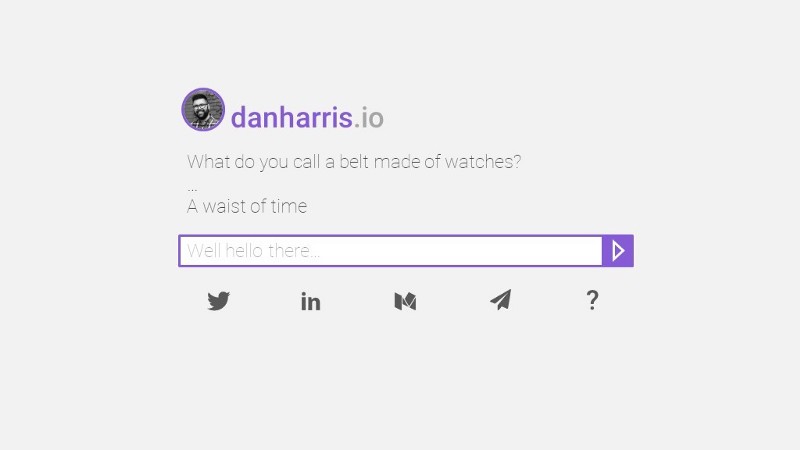
Our React Project is a simple one-pager site, with a picture of my smirking mug, a random dad joke (which will change on every page load), interactive input (this is where we’ll implement our logic later) and links to various social sites.
Componentize™ all the things
Using the above design, we can start breaking out the various UI elements & functionality into separate _components — otherwise known as _componentizing™. Mocking the app componentry at this stage will make it super easy once we start delving into creating our react app.
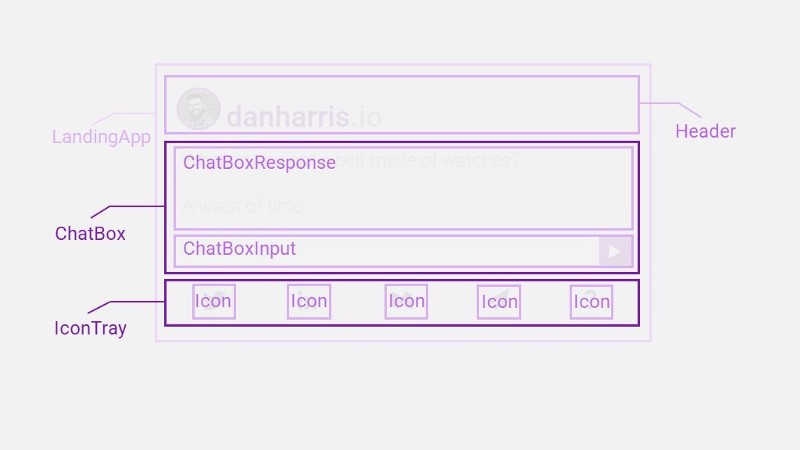
The simple single pager has been split into the various functionality and UI tidbits, along with logical containers for each section.
At this stage, an important idea to get your head around (if you haven’t already) are the terms smart & dumb (which are somewhat interchangeably used with the terms container & presentational) components. The distinction between these two types will be a bit clearer in later as we add a store for our app state. However, for the moment, think of container components as exactly that, logic containers for a section of app functionality. Presentational components are then the ‘dumb’ bits and pieces that display info/logic and possibly do some kind of simple functionality .
In our app, the container components will be the LandingApp and the ChatBox. These components will deal with App state, whereas the rest of the components (ChatBoxResponse, ChatBoxInput, IconTray, Icon & Header) will display our pretty styling & perform simple functions.
Let’s lay out some folders. (structuring our project)
To be honest, project layout causes me a bunch of angst. I’ve spent an inordinate amount of time trying to align my components and files into the most logical layout. I really crave that perfect file structure! After a bit of research, I ended up with something similar to this approach (coincidentally, this semi-matches the project layout I’ve used in Angular).
So we stoke up create-react-app danharris-io-landing (which will give us an initial react app layout), make some simple changes… and voila!
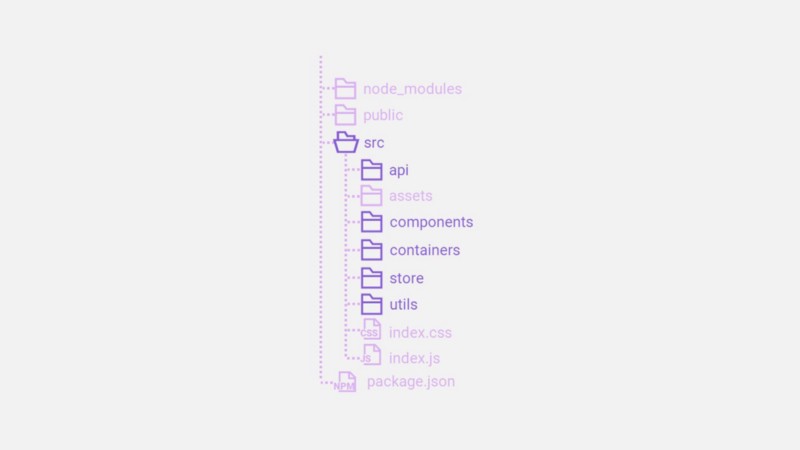
From the starter created by create-react-app we’ve added extra folders into the src directory;
- api: holds our api calls and any other external service accessors
- assets: holds importable assets, such as images
- components: holds our dumb components as single component js files
- containers: holds our smart components as single component js files
- store: holds our redux logic (we’ll add subfolders to this later in the series)
- utils: any util functions or other various shared functions
We now have a nice flat & categorised project structure. As the project grows we may decide to further split into subfolders within these major categories (e.g. a folder for each major API function namespace or for different providers, or we might put all the ChatBox components into a single ChatBox folder under components). For our simple react site, the above structure will be sufficient.
Create some Components
Now we have the base structure, we can start populating it with some base componentry. We wont worry about the content of the components just yet, just add them as a basic component skeleton.
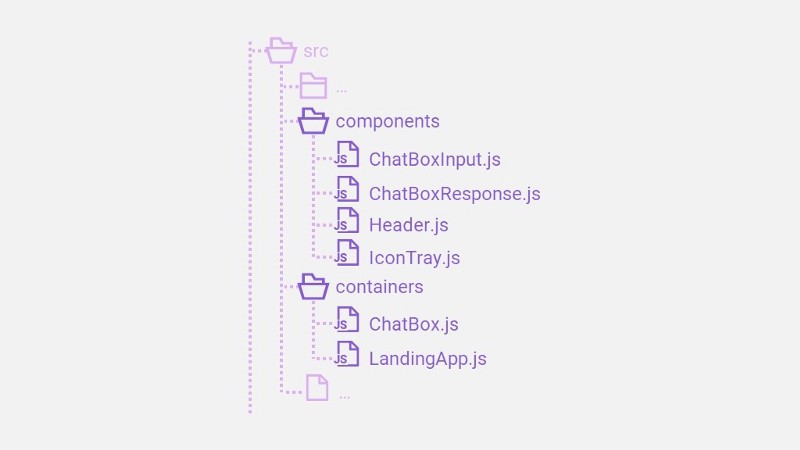
As you can see, we’ve mapped the components from the earlier mockup across to our project structure. We now have our container components, LandingApp (the React App container) and ChatBox (the component that will deal with App state to create an interactive chat), sectioned off from our dumb components. Creating a skeleton componentry of the project will also help us in part 2 when we start styling and adding content to the components.
Cool….. so now what
Looking at the pretty purple pictures wasnt enough? Well… have no fear! Now that we have a mockup, base project, component stubs and a good idea of our functionality and intended design we can start bashing some keys (a.k.a coding). In the next part of this series, we’ll delve into styling the components using styled-components and add some basic functionality. Stay tuned!
* If you want an in-depth look at the code for this project, it can be found on github.com/dan-harris
* Constructive feedback, opinions and comments are all welcome. Thanks for reading!
* Oh… and ‘Componentize™’ is not actually a trademark…but I did start using it recently to define the idea of creating components from ‘all the things™’